.png)

Introduction
“How do you find the time to send me those reminders?”
So said my real-life retainer client for my branding studio. He was literally so shocked that I was “on top of it all” (his words) and wanted to know my secret for managing everything.
My answer? “HoneyBook, baby!” More specifically, HoneyBook automations.
If you’re an entrepreneur who’s ever thought, “There’s gotta be an easier way to do this,” you’re in the right place. HoneyBook automations are like your virtual assistant you never hired.
With just a little setup, you can automate repetitive tasks, follow up like clockwork, and create client experiences that feel truly custom, without gluing yourself to your inbox.
As a certified HoneyBook Pro, I’ve learned what makes a solid automation tick AND what to avoid so you don’t get overwhelmed or distracted during setup.
I’m not going to lie to you. Automations *can* feel overwhelming. But it doesn’t have to be that way. So long as you take it one step at a time and use the data from your real-life client interactions to inform your automation setup.
Alright, let’s break it all down (without breaking your brain)!
Video overview of HoneyBook automations
What are HoneyBook automations?
Let’s be honest: you didn’t start your business to be your assistant. But if your day feels like a game of “did I send that?” or “wait, did I follow up?”... you’re running a system that depends on your memory, not your strategy.
And you don’t have time for that. You’ve got clients to serve (or vacations to take)!
HoneyBook automations help you shift from being reactive to proactive. Instead of doing the same task 30 times for 30 clients, you create a sequence you create once and it runs every time it’s needed. You can greet new leads, follow up on unpaid invoices, send prep guides before a session, or check in after the project wraps, all without lifting a finger.

Think of HoneyBook automations as your business on autopilot. They're customizable workflows that handle repetitive tasks based on specific events, saving you time while keeping your client experience consistent.
And now, thanks to HoneyBook Automations 2.0, you can go beyond just “send this when someone inquires”—you can even use conditional logic to only do X when the client does Y (more on that later).
Here’s what you can automate:
- Sending emails or smart files
- Updating project stages
- Assigning tasks to yourself or your team
- Sending reminders or follow-ups
- Even integrating with apps like Flodesk, Calendly, etc.
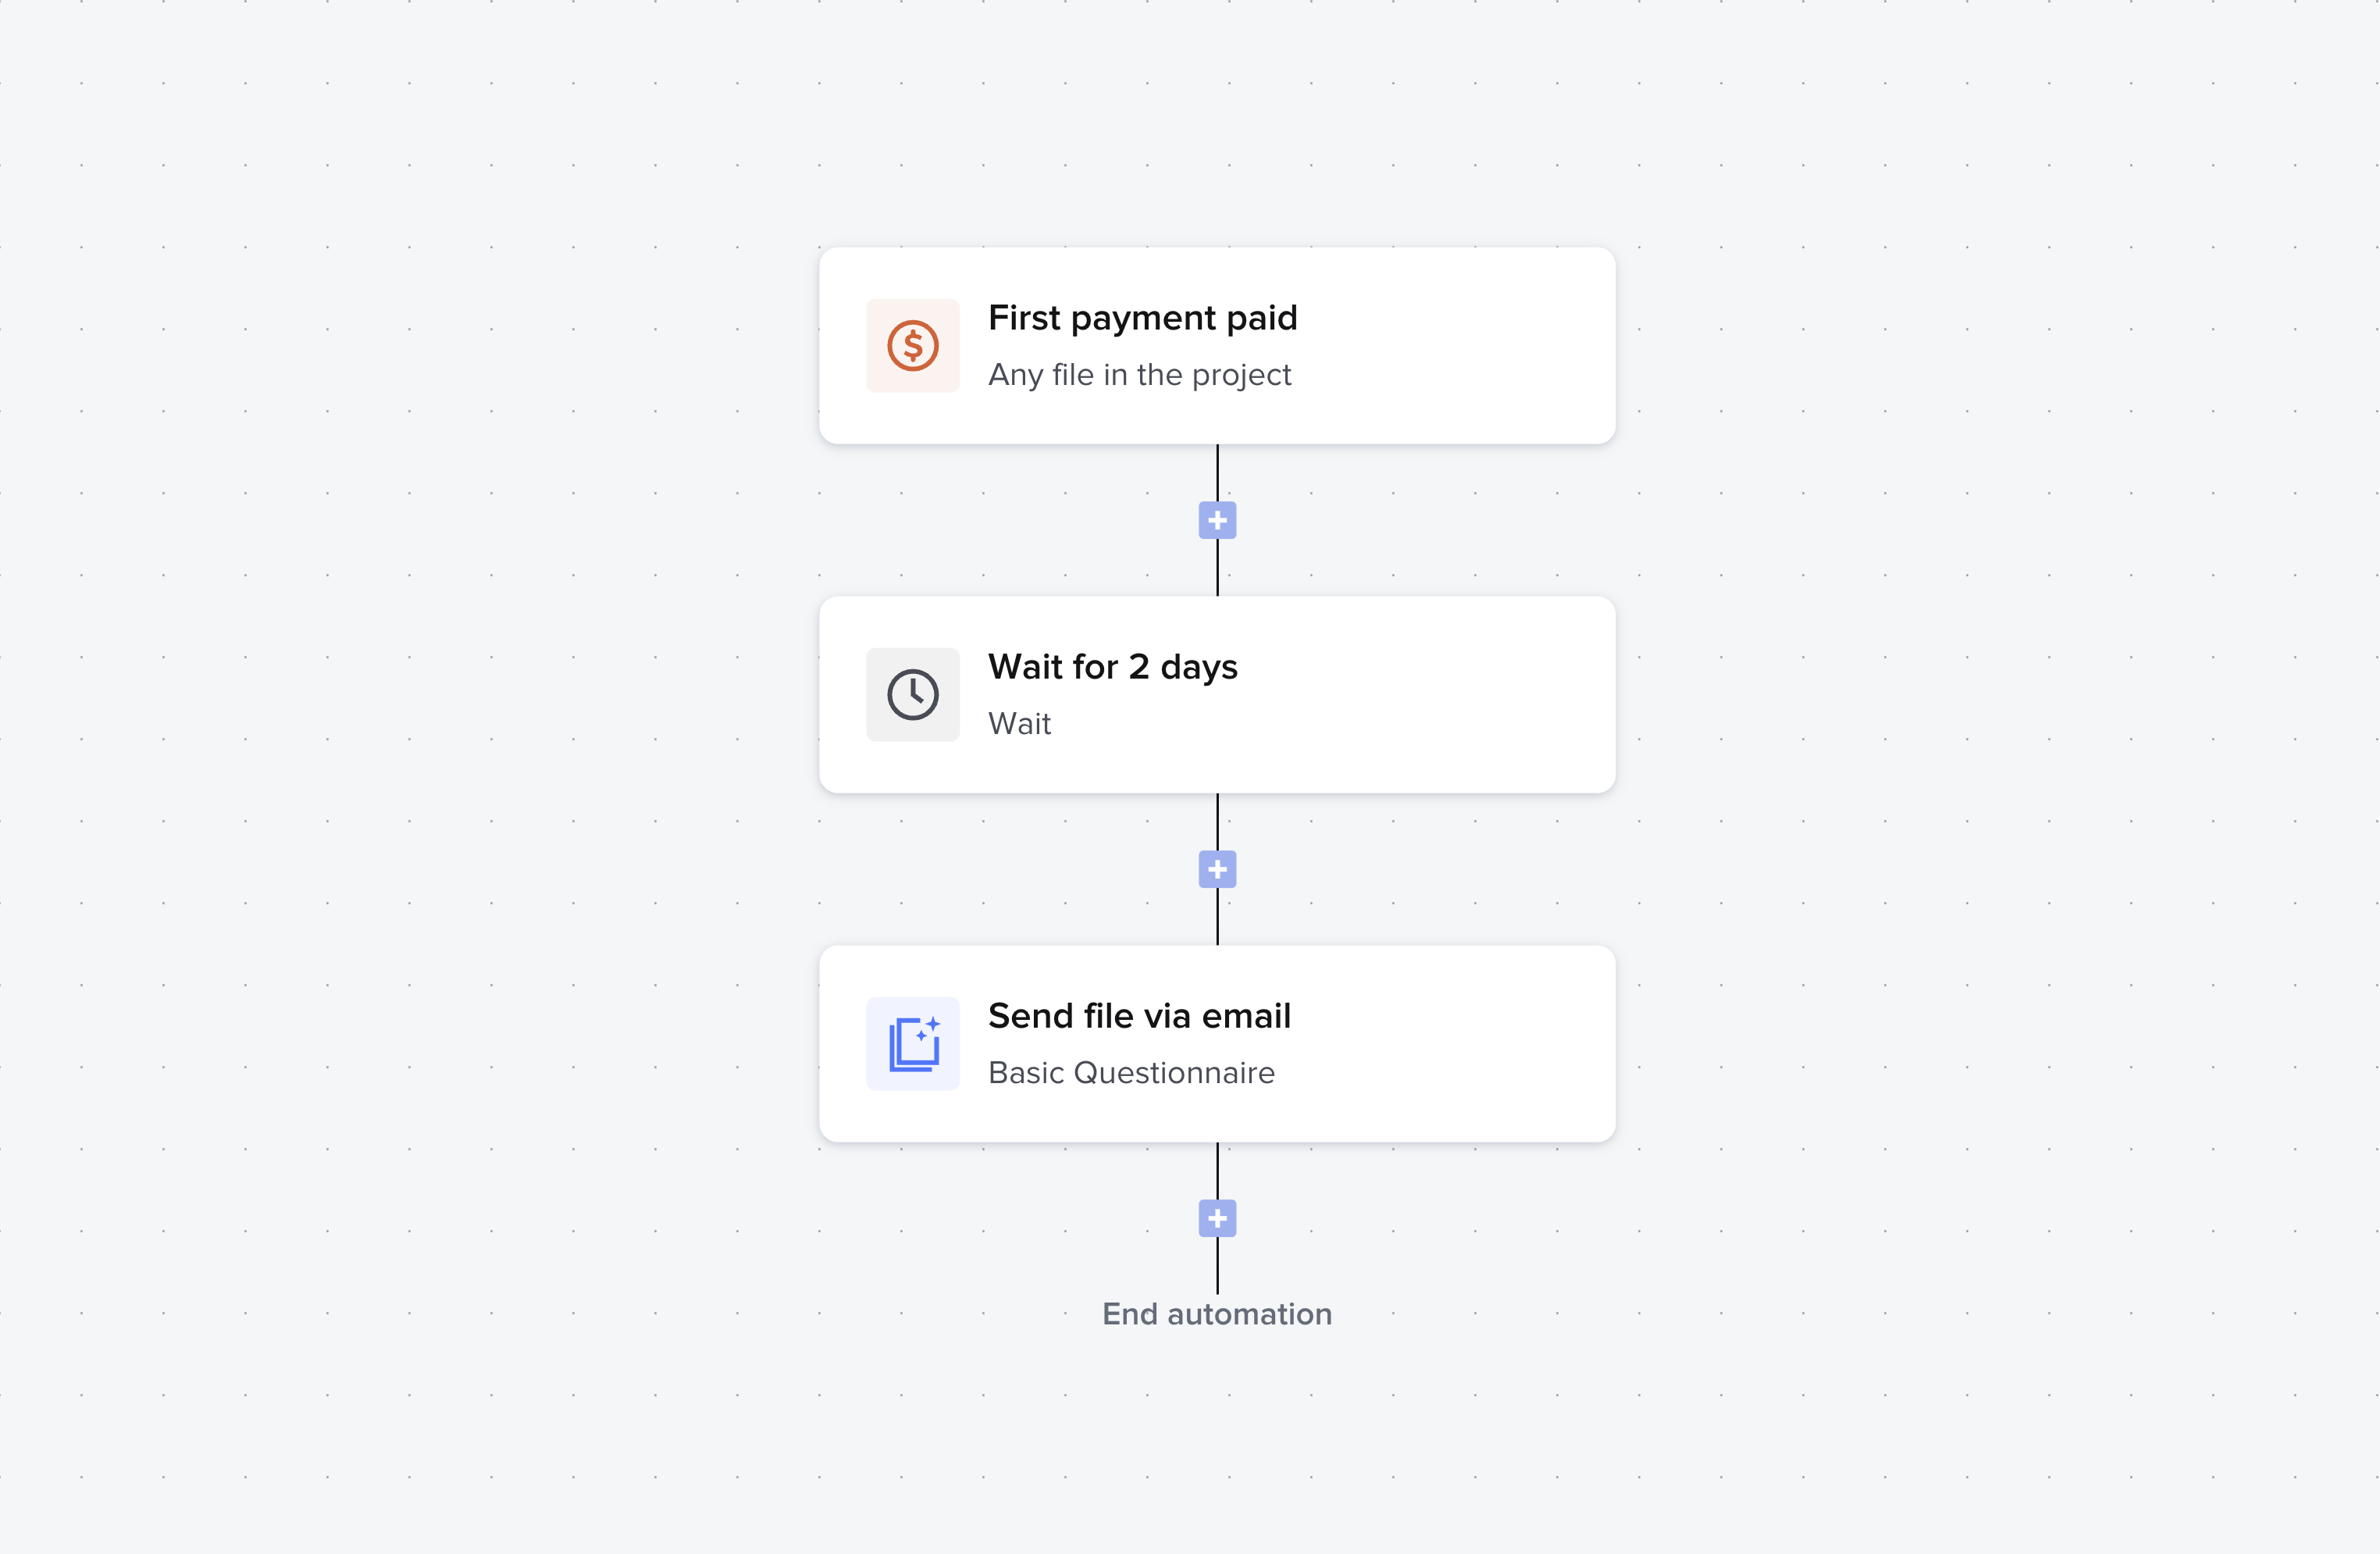
Quick example: Let’s say someone pays an invoice. You can:
- Wait 2 days
- Automatically send them a questionnaire
- Then, only if they’ve submitted it, send them a “Can’t wait to get started!” email. If not? A gentle reminder goes out 5 days later.
Now that we understand the basics, let’s dive into the details so you can really understand the full capabilities of HoneyBook automations.
How HoneyBook automations work
Automations are triggered based on an event that occurs inside HoneyBook. Once the automaton is triggered, your intended action can take place.
Automation triggers
Every automation starts with a spark. And in HoneyBook, that spark is called a trigger—the event that tells your system, “Hey, it’s go time!” The great news is that there are all sorts of triggers you can choose from. This flexibility means you can build automations around your process, not just HoneyBook’s old defaults.
You can trigger an automation from a:
- Contact form or lead form submission
- Meeting scheduled (with HB Scheduler, Calendly, or Acuity)
- Session completed
- Contract being signed (or fully signed)
- Invoice being paid (first payment or full payment)
- File or questionnaire being submitted
- Project stage changing
- …or manually, whenever you want (such as off-boarding)!
You can also further segment automations based on:
- Related files (specific or any file in the project)
- Project type (specific or any project type)
Automation actions, waits, and conditions
Once your automation starts, what happens next? That’s where actions, waits, and conditions come in. After the trigger happens, your action will occur. This can take place immediately after, or you can use waits and conditions to further customize how you want the action to occur. Think of these like choreography for your client experience—each step happens in order, exactly as you rehearsed.
Here’s a quick glossary:
- Actions = what HoneyBook does (like send an email or assign a task)
- Waits = pause between steps (set amount of time or until an event happens)
- Conditions = branch your automation depending on whether a condition is met!
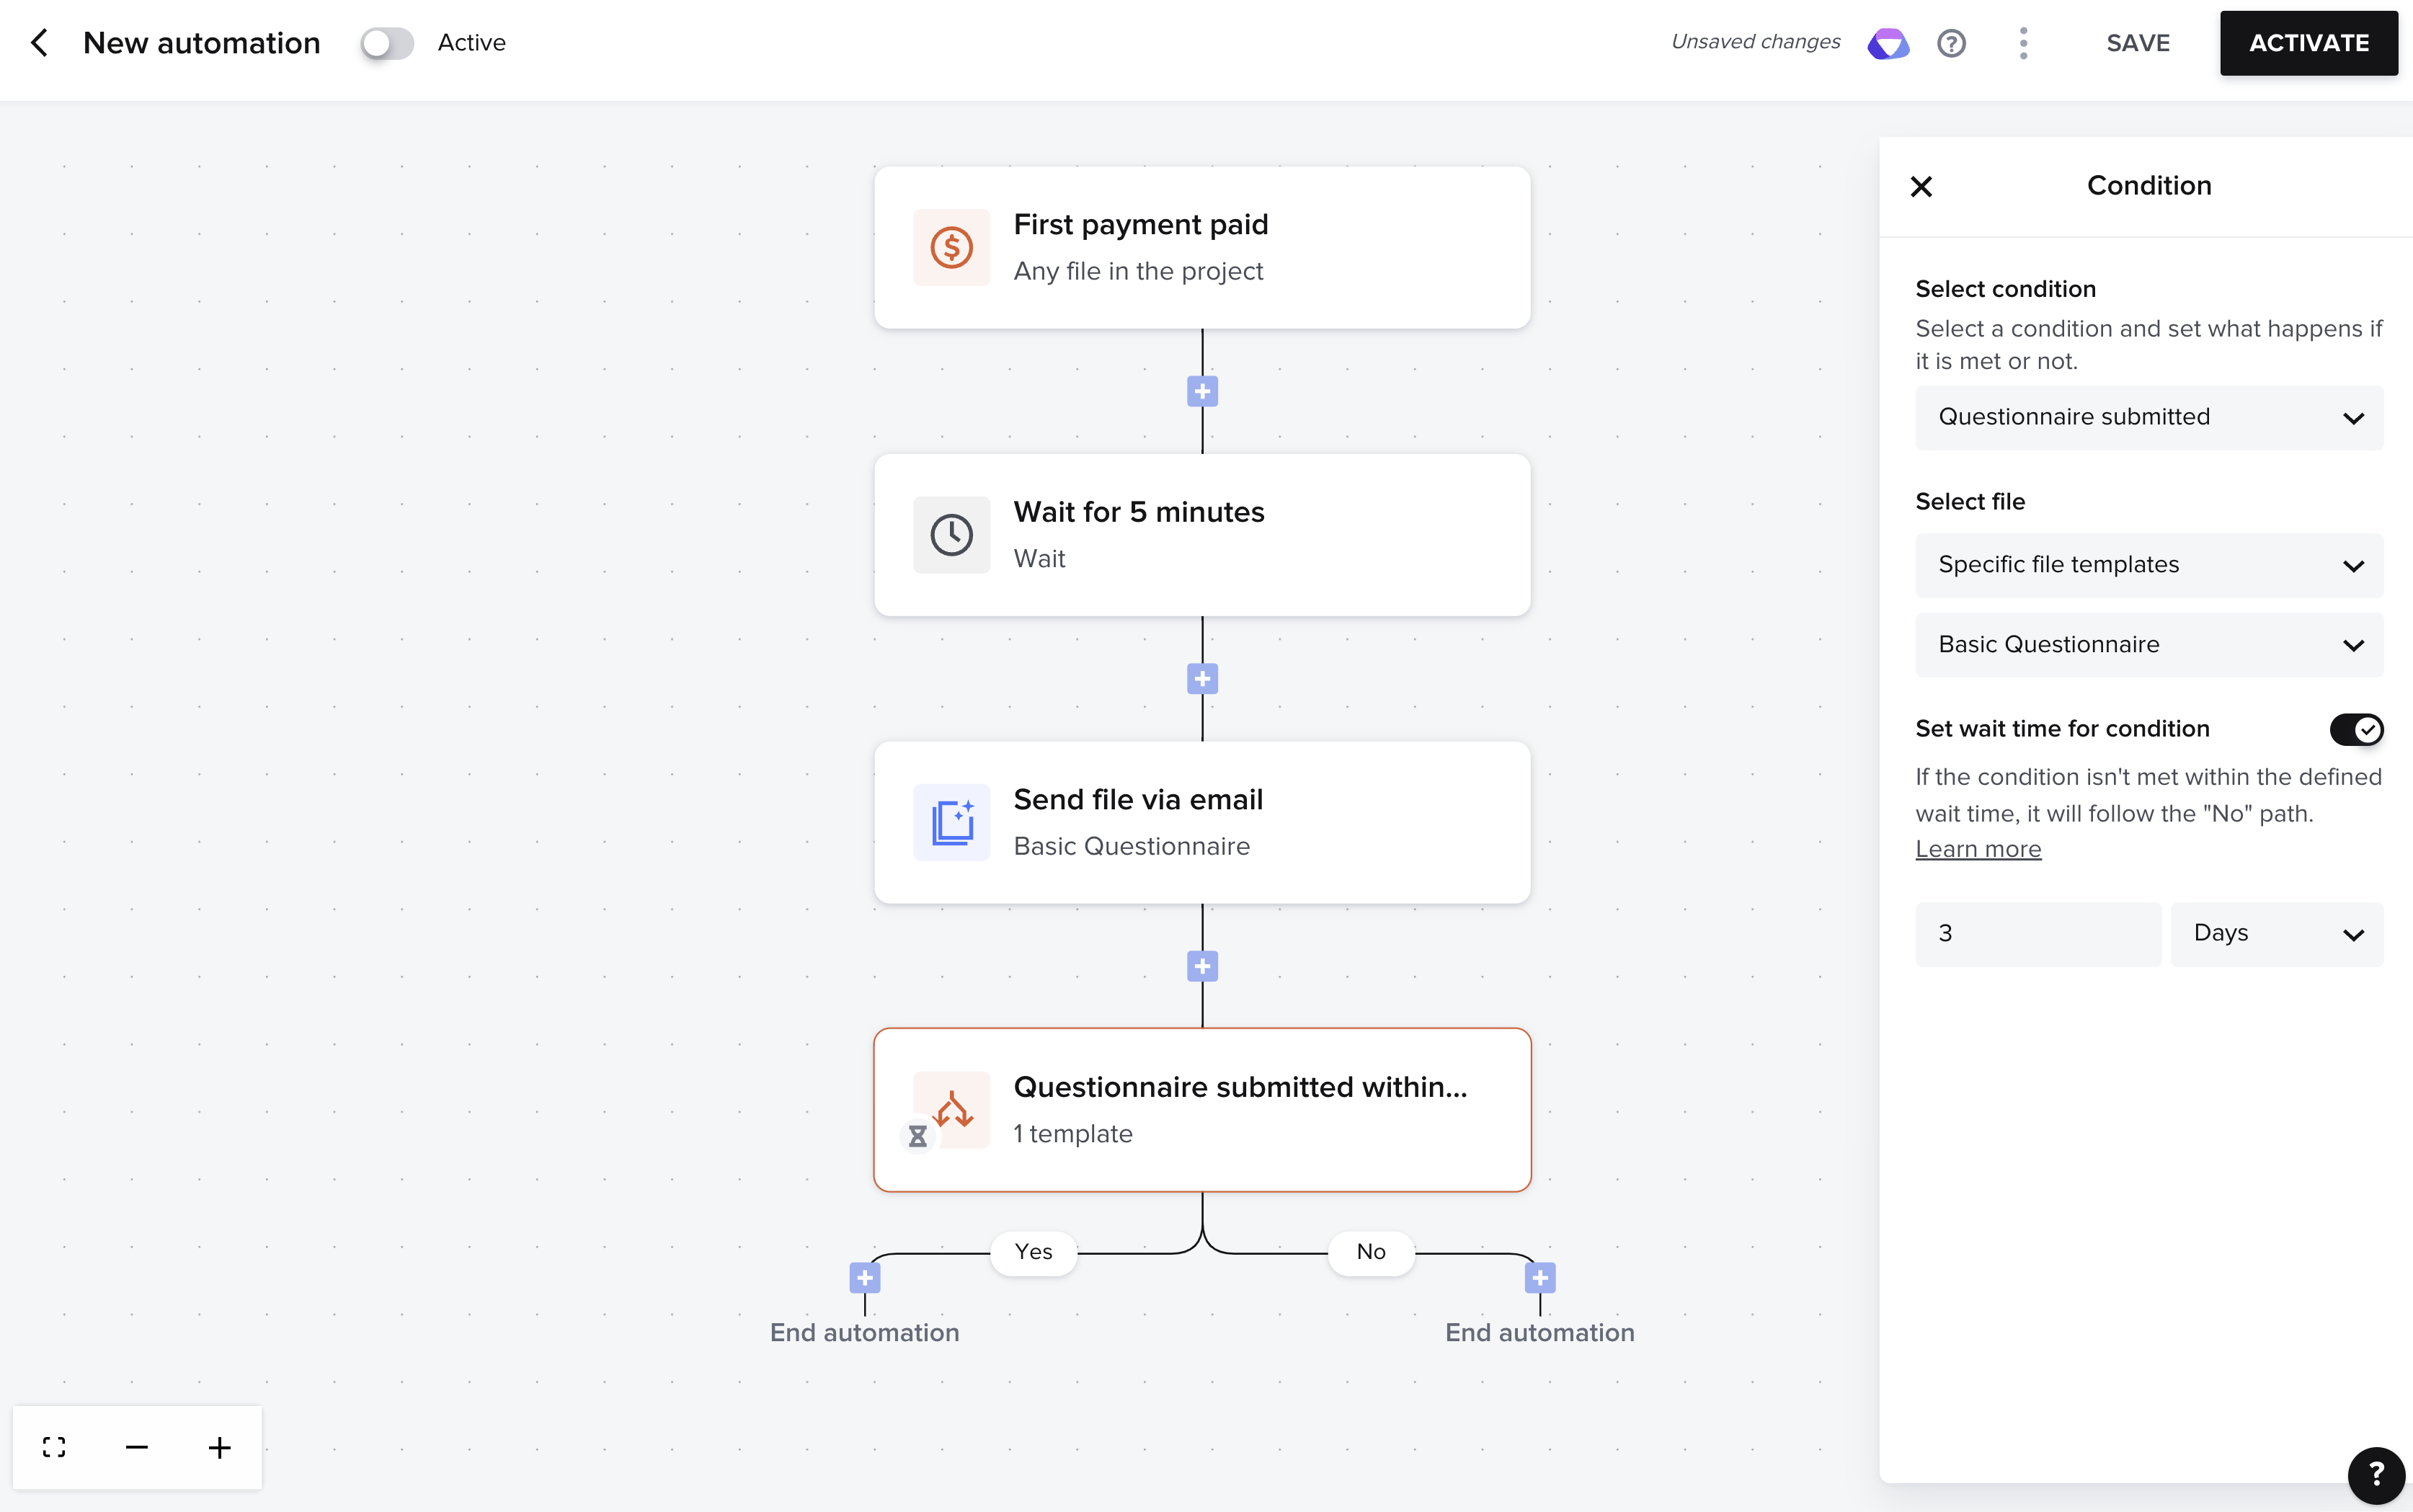
This last one is super important. Conditional logic is your automation’s secret sauce. It lets you say, “If X happens, do this. If not, do that instead.” With conditional logic, you don’t have to guess or send awkward emails, you can let the system adapt in real time.
For example:
- If the client signed contract → send onboarding questionnaire
- If the client viewed contract but didn’t sign it after 3 days → send a reminder
Getting started with automations: 1-step vs. Multi-step
Let’s be honest: building a 15-step automation your first time out is...a lot. So don’t. Please, please, please do not. Save yourself the stress.
Start with one step. One win. One “wow, I didn’t have to do that manually!”
Once you see the impact, you’ll want to build more. You’ll also be able to use real client interaction and data to inform what you’d prefer to be automated and when it should happen.
How to start simple:
- Trigger = Lead form submitted
- Action = Send “Thanks for reaching out!” email to let your lead know you received their inquiry and invite them to book a free consult with you (via HB scheduler link)
Then scale:
- Add a wait (1 day)
- Add a condition: “Did they schedule a call?”
- Yes → Send call services brochure smart file
- No → Send gentle reminder with link to book + move pipeline stage to followups
- If they still don’t book after 5 days → send a final followup email
- If they don’t book after that → create a task for you to archive them
Pro tip: Start where you are, and let your system grow with your client experience.
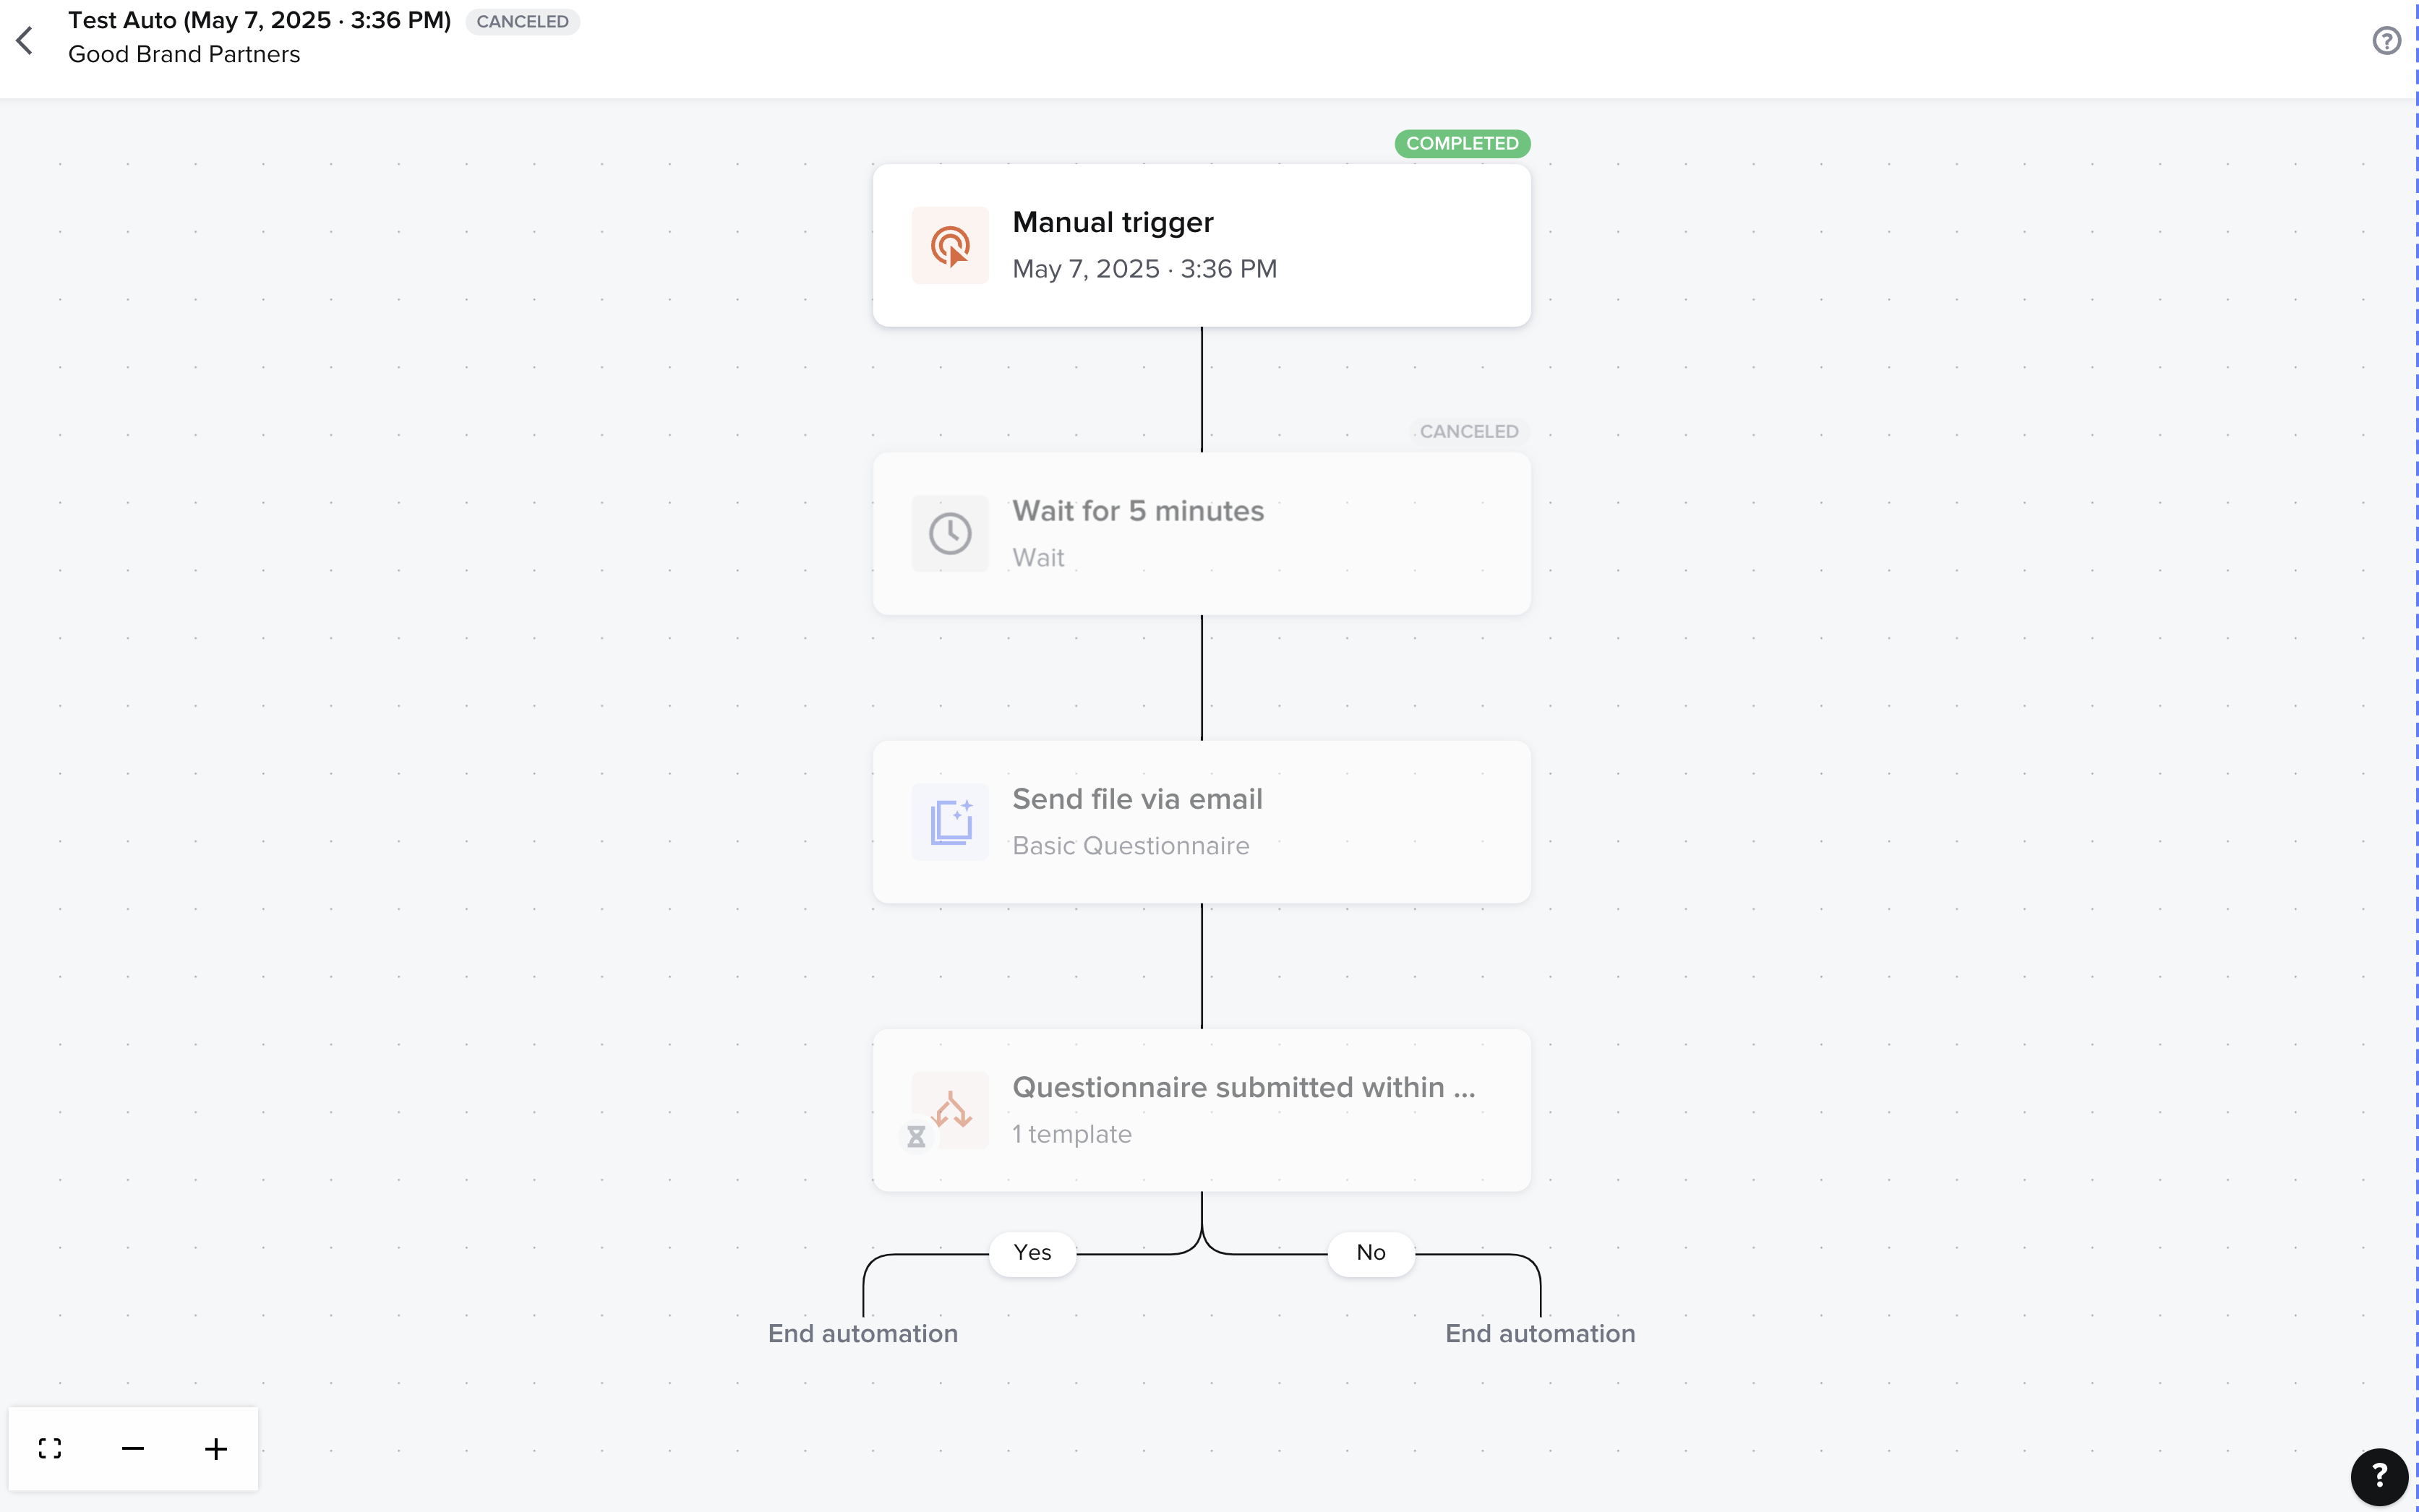
How to run a test automation
Measure twice, cut once! My middle-school woodshop teacher lived by this phase. And it totally applies to automations, too.
Way before you ‘go live’ with an automation, you can test your automation draft safely inside HoneyBook, without accidentally confusing your real clients.
Here’s what I like to do:
- Go into your draft automation
- Swap the intended trigger for the manual trigger + leave all other steps as is
- Create a test project type — call it “Test” (or something funny like “Not a Real Client, Promise”... “Testy McTestface”...or even “Hot Mess Express Automation Test”)
- Within the project, on the right sidebar scroll down to Automations
- Apply the manual trigger test
- Let the automation run and see what comes up
Pro tip: when editing your draft automation, change any waits or timed delays to be 1 min vs. days. That way you can test your automation within a few mins instead of spreading it out over the real duration.
How to keep track of automation runs
Once your automations are live, it’s natural to wonder: “Is this actually working?”
Like most features in HoneyBook, you can find information in a few places. To see if your automation is running correctly, you can check:
- Automatons tab in main navigation → Activity
- Project workspace for a client → sidebar under Automations
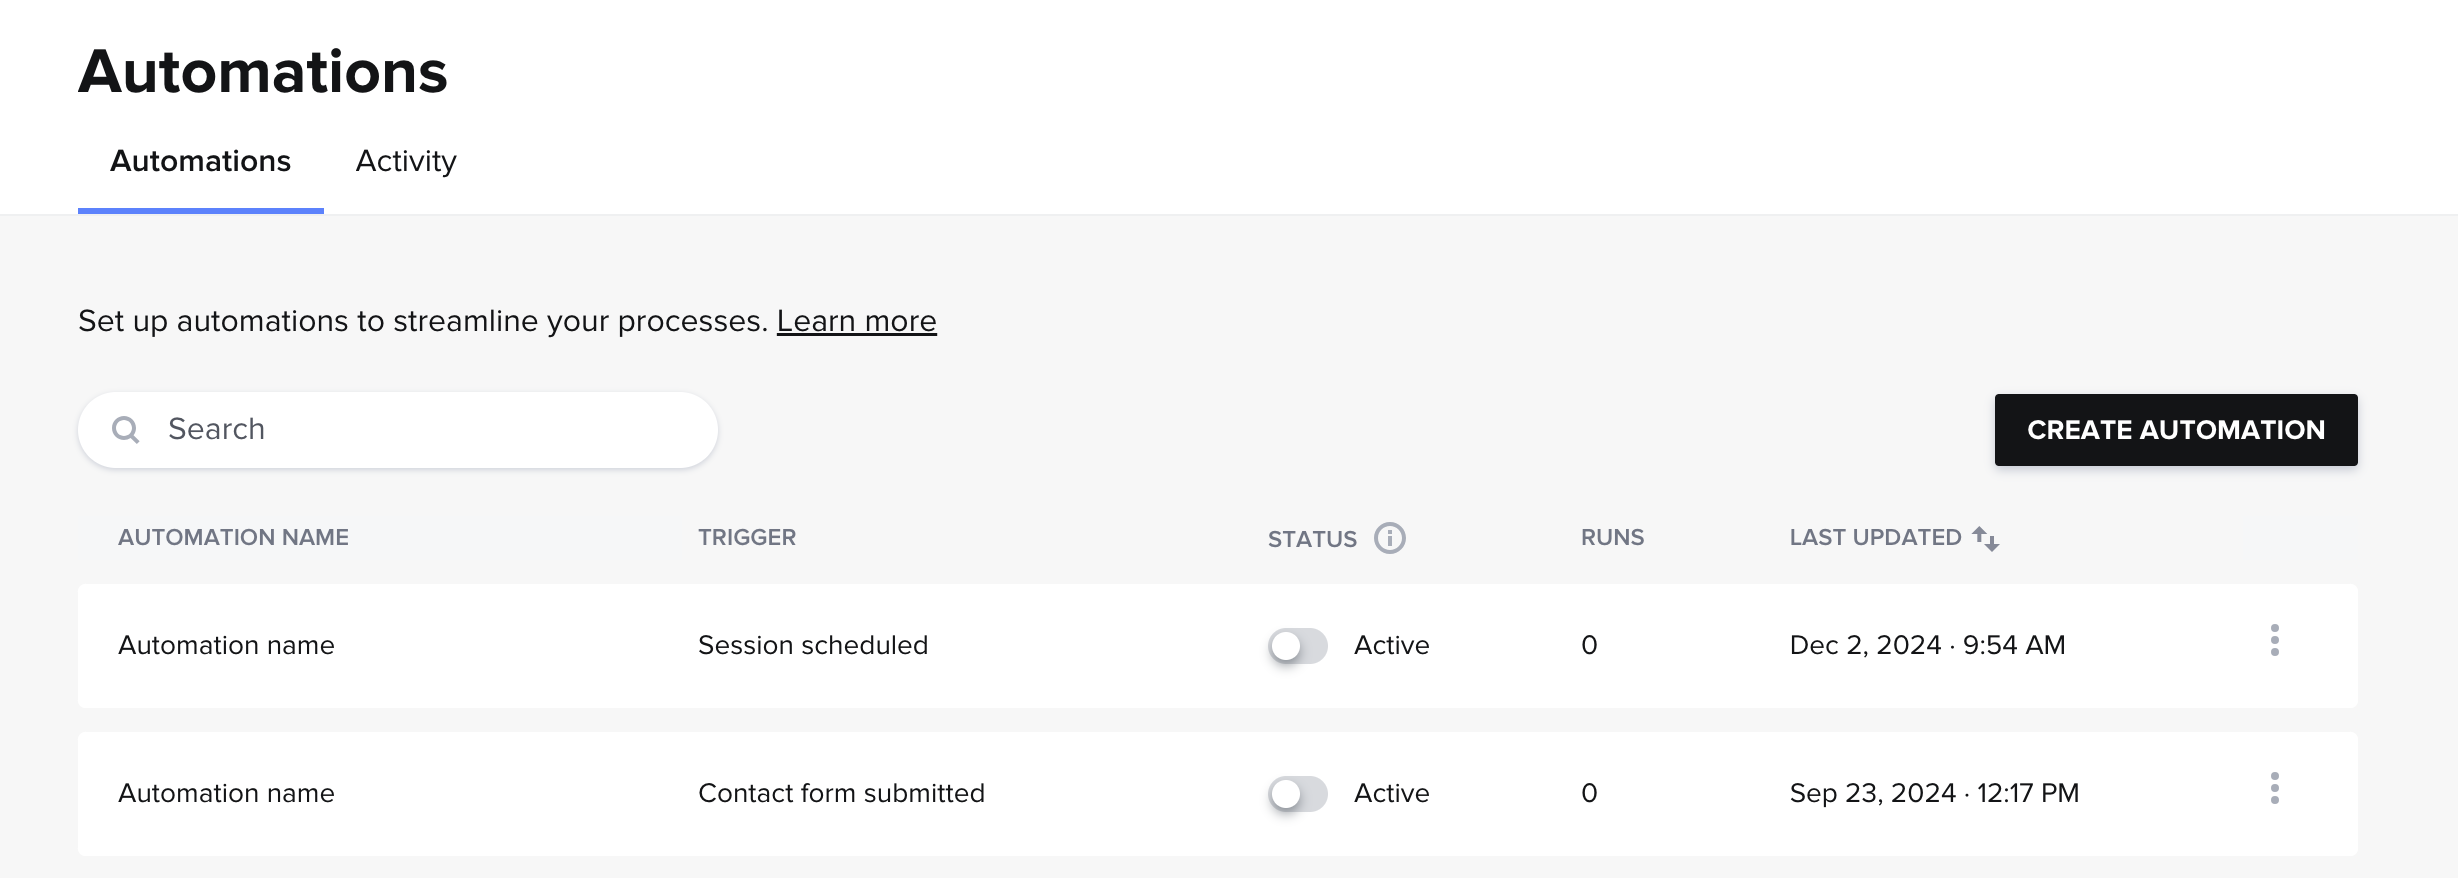
The Activity tab is a real-time dashboard showing every automation run across all your projects—when it started, what step it’s on, and whether it finished or hit a snag.
Instead of hunting through individual projects, you can:
- See every automation run
- Filter by project, automation name, or status
- Know what step a client is on
- Spot errors before they cause delays
From there, you can cancel, duplicate, or tweak automations as needed. Because even your best systems need a little check-in now and then.
Troubleshooting automations
If you’re like me, right after you finalize your first automation, you’ll feel super proud. And rightfully so!
But then a day will go by, and you’ll wonder why the thing didn’t do it’s thing.
No need to fret. It happens to all of us! If your automation isn’t working, don’t assume it’s the end of the line — simply check the basics.
Whenever an automation doesn’t trigger, there are two top culprits:
- It’s not active. Yep, you have to turn it on, and yes, I’ve totally made this mistake!
- The project type doesn’t match. If your automation is only set to fire for “Brand Design” projects, and the project is labeled “Other”? It won’t trigger.
Here’s how to fix it:
- Double-check the status of the automation is active. Go into Automations and ensure the little toggle is flipped to the on position. If it’s grayed out, it’s not on my friend!
- Review the trigger conditions and project types
- Check the Activity tab for errors or missed steps
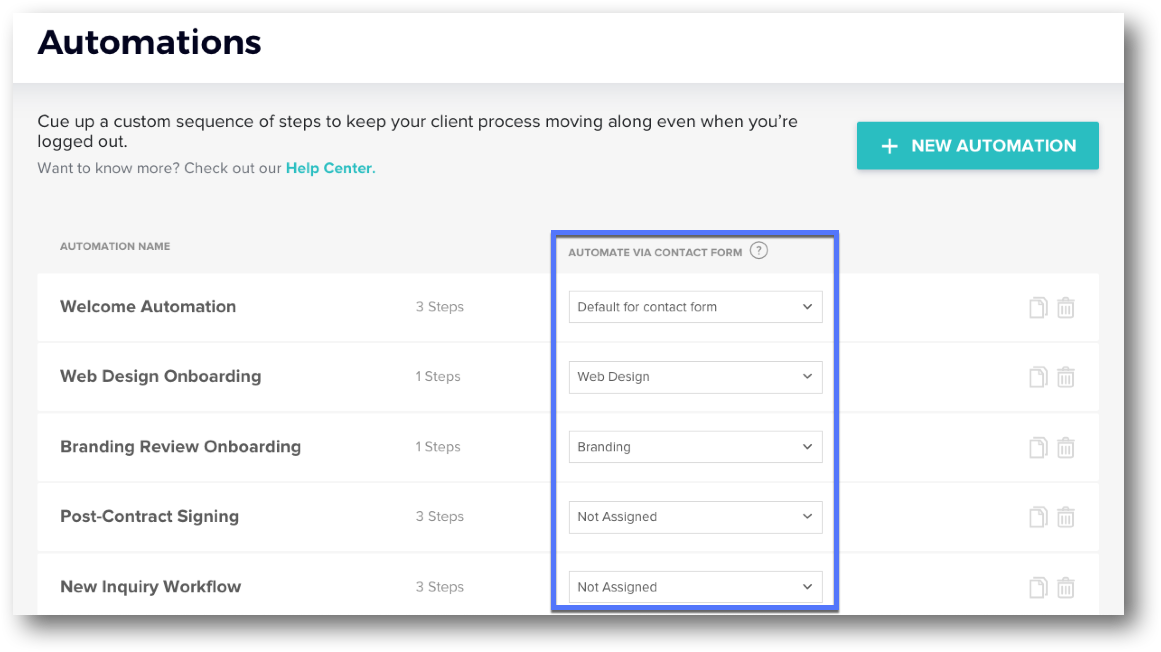
How to cancel or edit an existing automation
We’ve all had that freakout moment… when something is sent to a client by accident because you never finished the setup. Or a new client interaction that requires you to step in and manually take action.
Yes, HoneyBook automations are designed to allow you to use a bit of cruise control. But that doesn’t mean they are 100% foolproof, or you’ll never need to get your hands back on the wheel.
Thankfully, it’s pretty easy to stop or adjust what’s running, so your workflows stay aligned with how you actually work (not how you thought you’d work when you built it at 11PM last Tuesday).
To cancel an automation run:
- Head to Tools > Automations > Activity tab
- Find the automation run you want to stop
- Click the three-dot icon next to the run
- Select Cancel run
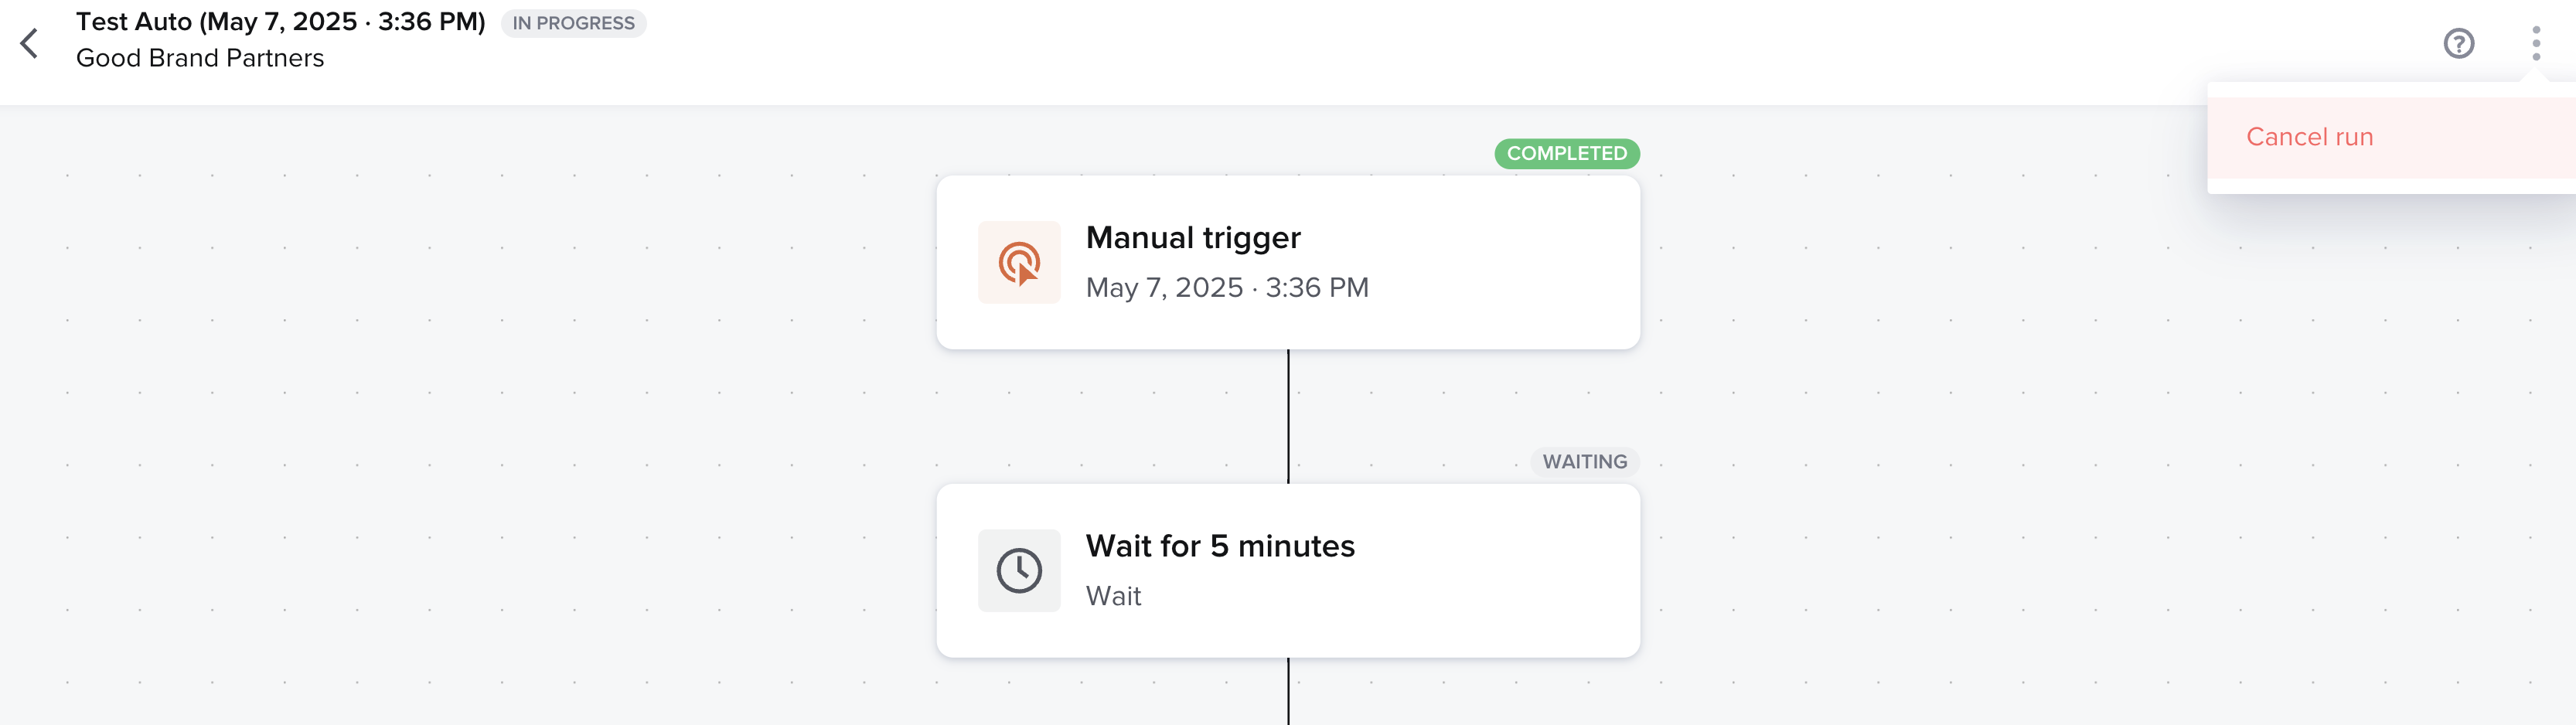
Afterward, that project’s automation will stop right there. Any future steps in the flow won’t fire.
To tweak an existing automation:
- Go to Tools > Automations
- Find the automation you want to update
- Make your changes
- Click save or activate
To create slightly different automation:
- Click into the automation you wish to duplicate
- Once inside, click the three-dot icon > Duplicate
- Open the copy in the builder and make your edits for this version
- Click Activate to turn on the new version
Note: You can’t edit automations that are already running mid-run, so your best course of action is to cancel the remaining steps and then update the Automation Template so future clients get the improved workflow.
Comparing Automations 2.0 with the old builder
Still using the old HoneyBook automation builder? It’s time for an upgrade. Automations 2.0 isn’t just a visual refresh—it’s a whole new playbook.
Before, automations were decent, but they honestly were a bit too clunky, linear, and limited to one at a time. Now? You can build full workflows that flex with your client’s behavior, tap into external apps, and apply across your whole pipeline—not just one project.
Old version
New version

Important differences
You can now build mini-systems that run across your entire process. Kind of like moving from a flip phone to a smartphone (though if I’m being honest, I always wanted a Razr phone, ha)!
Here’s what you can do with the new builder:
- Run multiple automations in a single project — FINALLY!
- Use conditional logic (if/then)
- Integrate with third-party apps
- View all of your active automations, across all projects, from one place
- Enhanced builder design for easier automation creation
How to upgrade to the new version
From the main navigation, select Automations. Once here, you should see a dialogue box at the top of your screen encouraging you to switch over to Automations 2.0.
If for some reason you do not see this, no worries — simply use the (?) chat button on the bottom right side of the screen and ask a specialist to help make the switch.
Get help from a HoneyBook automation expert
As you can see the new HoneyBook automations are pretty freakin’ cool!
But they can also feel like *a lot* of work to set up. That’s why it’s so important to go at your own pace and let your own unique process and clients be your guide.
Remember: data + intuition = smart systems.
However, your client experience deserves more than guesswork. Whether you need help mapping a multi-step flow or just want to know “what should I automate first?”—we’re here to help.
At Good Brand Partners, we believe you don’t need to be a designer or techie to build a business that looks good, feels good, and frees you up to do your best work.
For automation support, you’ve got two options:
- Enroll in one of our DIY courses
- Book a free consult with a HoneyBook automation expert (me!)
Oh, and if you somehow stumbled across this article and you aren’t yet using HoneyBook… what are you waiting for?! Just kidding. But I do highly recommend you give HB a spin.
Use my link to try it for free and save 30% off your first year if it fits.
Alright, that’s all for now. Until next time, keep making good out there!